Simple autograding with GitHub Classroom + GitHub Actions + CML Container
Introduction
In this article, I introduce a simple autograding system on GitHub using GitHub Classroom + GitHub Actions + CML Container. This system allows to do the following:
- A grader assigns a programming task to students.
- The students solve the task (write code).
- The students can submit their code to the grading system as many times as they want. The system automatically returns the grading results to the students each time.
- (The grader will grade the final submitted code again with different parameters.)
In programming education, feedback from grading is essential. Trial and error by hand are necessary to improve coding. The feedback by the autograding can give students the opportunity for such trial and error. The autograding system also helps prevent careless mistakes in output formatting, such as forgetting to include spaces.
I will assume that the students are a beginner of the C language. The only thing students need to do is prepare their GitHub account.
I intend this article is for teachers who teach programming courses at universities. Comments and feedback are welcome.
Autograding system
Now let me introduce the system. You can check all the code here. Here, the assignment is in the form of a GitHub repository, organized as follows.
.
├── .github
│   └── workflows
│       └── autograding.yaml
├── README.md
├── eval.py
└── main.c
Let’s distribute this repository to each student (one for each) and ask them to edit main.c. The task this time is to print Hello World! by $ ./a.out
The main.c contains the following template.
#include <stdio.h>

int main () {
    printf("Hello Word!!\n");
}
The task here is to fix the mistake inside printf.
Students will copy this main.c to their own environment and code it.
After coding, they will update the repository by copying and pasting the result to main.c on GitHub.
Since I assume that the students are beginners, they can simply edit the file from the GitHub web interface instead of using the git command. Of course, the students can also use the git command.
That’s it. After editing main.c, the students will see their results of the autograding directly under the commit. Let’s check it out.
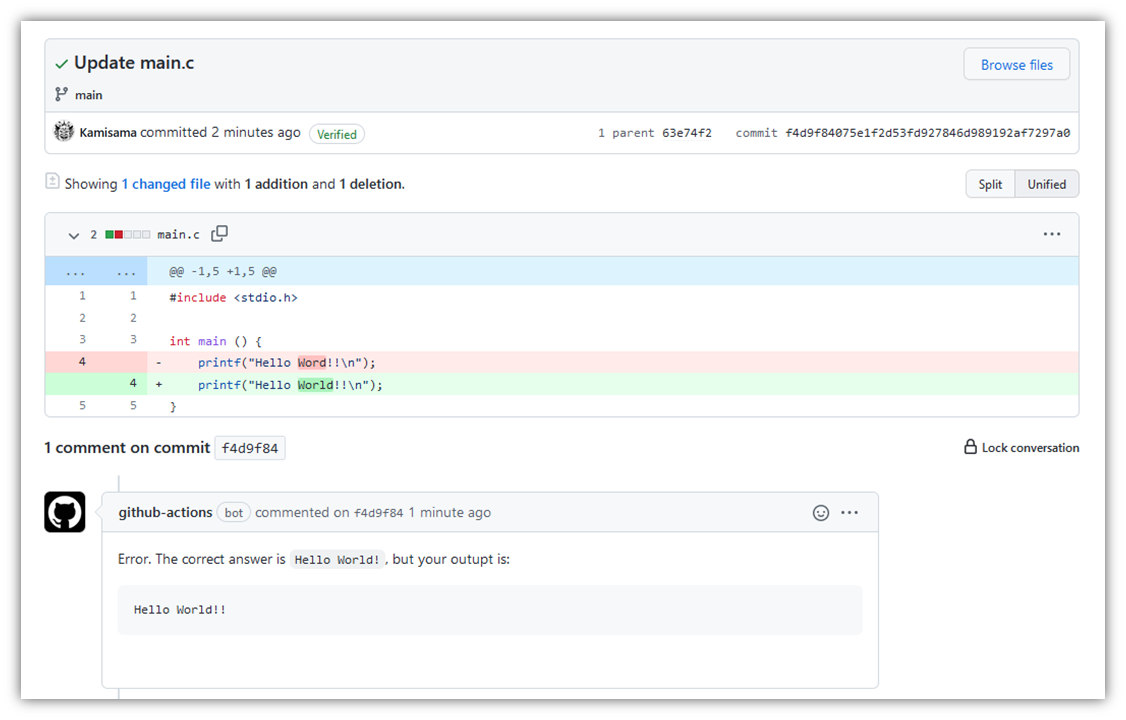
Here, the student has revised Hello Word!! to Hello World!!.
Now, from the top page of the repository, the student can press the “Commit List” button in the upper right corner.
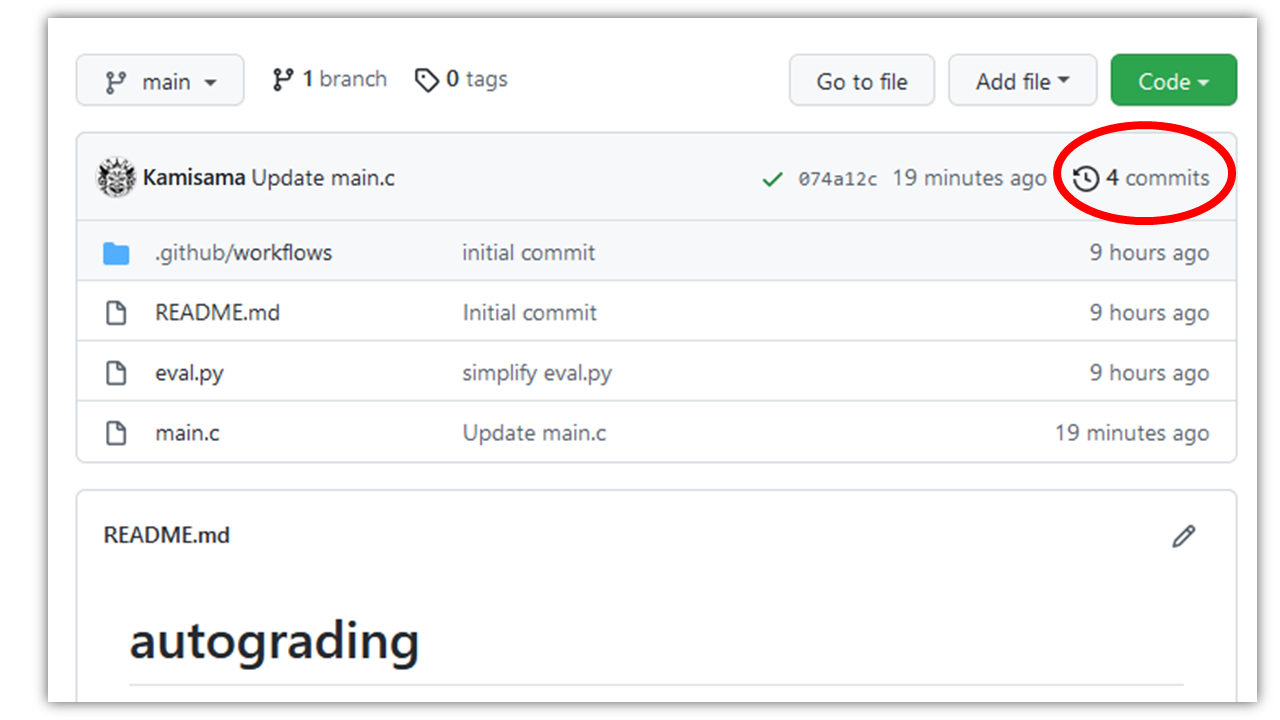
This will bring up a list of commits, as shown below. The student can select the last commit.
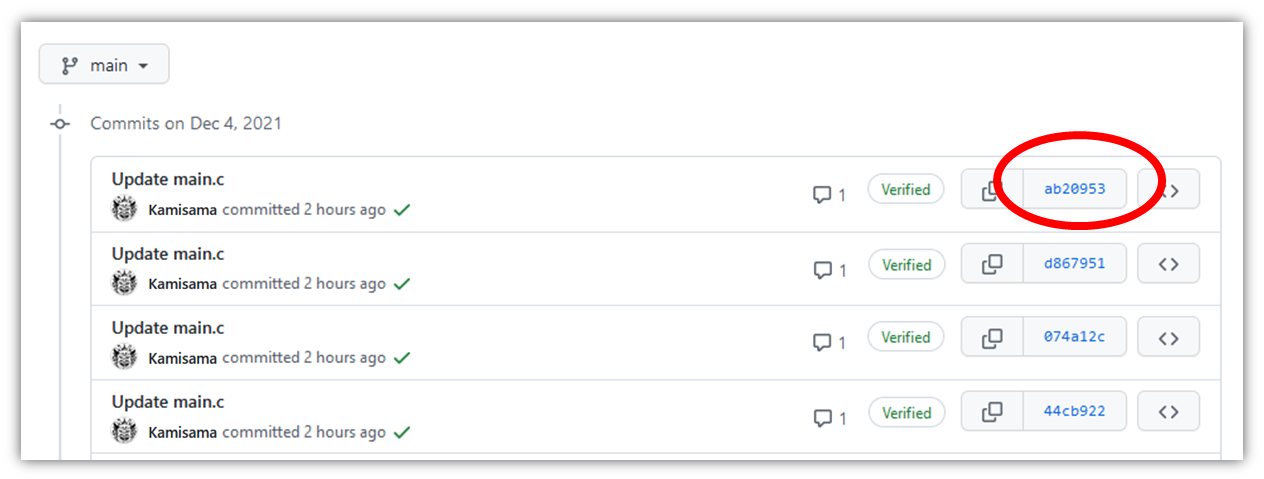
The student can check the update (commit) as follows.
However, one more ! still exists, and the grading will fail.
The student can see the grading result at the bottom of the commit in the form of a notification from a bot called github-actions.
You can see the actual commit here.
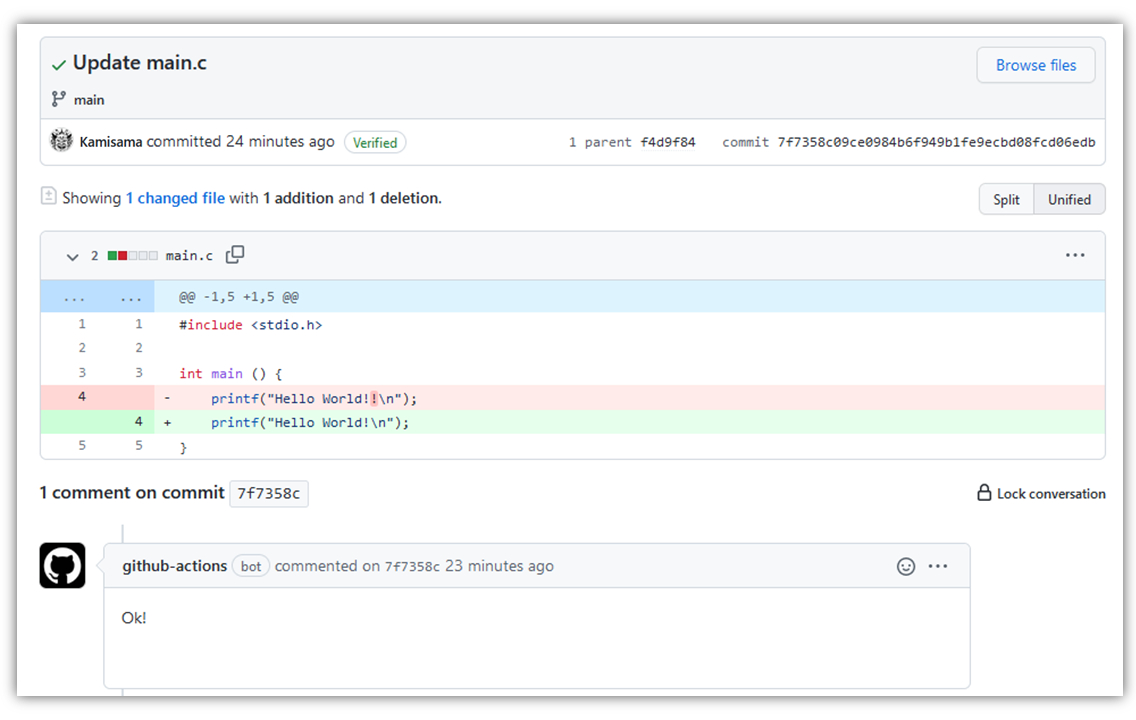
Here, the student can modify the content again to display Hello World! correctly. Then the autograding will success as follows.
Actual commit is here.
In this way, the students can know the result of the autograding interactively every time they update main.c.
As shown above, the students can quickly check the results with just a few clicks from the GitHub web interface.
How it works
This section explains how the system runs autograding just by committing.
eval.py is the code that compiles and executes main.c and checks the result.
(For the sake of explanation, eval.py is a simple code, but you can update it as you want.)
import subprocess

def run_job(cmd):
    ret = subprocess.run(cmd, shell=True, stdout=subprocess.PIPE, stderr=subprocess.STDOUT)
    return ret.stdout.decode(('UTF-8'))

if __name__ == '__main__':
    # Compile
    run_job("gcc main.c")

    # Run
    msg = run_job("./a.out").rstrip()
    if msg == "Hello World!":
        print("Ok!")
    else:
        print("Error. The correct answer is `Hello World!`, but your outupt is:")
        print("```")
        print(msg)
        print("```")
Now, the students run this eval.py to evaluate their code, but we shouldn’t ask them to do it manually.
Because
- We don’t want the students to download and run the script themselves because they are beginners. We want the system to grade when
main.cis updated automatically. - If we want to run the script on the students’ PC, they will have to prepare the Python environment, which is generally hard.
So we use GitHub Actions to run the above script automatically in the cloud computer.
I show the procedure in .github/workflows/autograding.yaml. This action will run eval.py and display the result whenever the student commits.
name: autograding
on: push
jobs:
  run:
    runs-on: ubuntu-latest
    container: docker://ghcr.io/iterative/cml:0-dvc2-base1
    steps:
      - uses: actions/checkout@v2
      - name: autograde_task
        env:
          repo_token: ${{ secrets.GITHUB_TOKEN }}
        run: |
          python eval.py >> report.md
          cml-send-comment report.md
Let’s look at a few points.
- There is
on: push, so when one pushes the commit, the followingjobswill be automatically executed on the cloud-computing resource of GitHub. - It is important to note that we are using the docker image of Continuous Machine Learning (CML) by
container: docker://ghcr.io/iterative/cml:0-dvc2-base1. This image enables us to un the commandcml-send-comment. - In the
steps, we run the evaluation code,python eval.py, and write the result asreport.md. - The markdown file is then posted in the bottom of the commit page by
cml-send-comment.
CML is a library for machine learning with CI/CD. cml-send-comment is a command to show the result of computations performed in GitHub actions on the pull request page. In the proposed system, we use this function for the feedback of autgrading.
According to the assignment, you have to prepare just eval.py and main.c.
The advantages of the proposed system are as follows.
- Basically, it is free of charge (as we will see later, the system will cost if you compute lots).
- By letting GitHub Actions handle the grading process, you don’t need to maintain a server for grading.
- The above is all the code you need to write, so there is little effort for you to prepare. Also, since we don’t use any external service, you can control all procedures by yourself.
- When a student asks a question, all the code/outputs are stored in the repository, so it is easy to find the cause.
- From the student’s point of view, there are no “forgotten submissions” or “submission errors”. The grading process is intuitive because the system runs whenever the students update the repository.
Q&A
The following is a list of Q&As.
- How do I distribute a repository to the students?
- You can use GitHub Classroom. Note that it’s not easy if you distribute it by yourself. You need to satisfy the following: (1) you need to distribute a copy of the assignment repository to the students as a private repository, (2) the students cannot see each other’s repositories, and (3) you can see all repositories.
- For a small class, you may be able to create repositories and set permissions manually.
- How to achieve the final grading?
- All repositories created in GitHub Classroom can be easily downloaded using GitHub Classroom Assistant. You can run
eval.pylocally with different parameters for the final grading. - For example, consider a program that computes the sum of the numbers given by arguments. We can test it for autograding by e.g.
./a.out 3 5to see if it prints8. In this case, if the student writes a cheating program that outputs8directly, such asprintf("8");, it can pass the autograding. However, in the final grading, you can test./a.out 10 7achieves17or not. It will reject the cheating program.
- All repositories created in GitHub Classroom can be easily downloaded using GitHub Classroom Assistant. You can run
- Comparison with other services
- Managed services (Gradescope, Techful, etc.)
- If you use an external managed service correctly, it may be easier because you don’t need to manage anything. The UI would be good and easy to understand for the students. As for the weaknesses: (1) The initial cost is high, as you need to create accounts of the service first. (2) There is a high possibility that you will have to pay a fee. (3) It isn’t easy to do something that the service doesn’t assume you to do.
- Autograding on GitHub Classroom
- Actually, GitHub Classroom has an autograding function. The drawback is that the students need to see the Action tab (CI/CD console) to check the grading result. So, for a beginner, looking there can be costly. This would be a good choice for intermediate-level students or above.
- Example of combining with VSCode: Submission of assignments in GitHub Classroom, Applied Quantitative Analysis 2 (2021), Hiroshi Kajino: GitHub Classroom has a function to run assignments in conjunction with VSCode. If you are using Python, this is an easy way to do it.
- Homemade services
- One of the most common ways for autorgrading is to (1) ask students to submit assignments via email or the university’s LMS service, and (2) set up a grading program to analyze and grade the submissions. The weaknesses are (i) you need to build and maintain the pipeline of the grading system yourself. (ii) It isn’t easy to give feedback to the students. (iii) It’s a bit of a hassle for students to attach their work to an email or submit it to the LMS service. I propose my system to replace such homemade service using GitHub
- Judgment systems for competitive programming (Aizu Online Judge, oj, etc)
- Online judging systems in competitive programming are similar to the goals of this article. Open-source implementations of them also exist. I have not fully investigated this area, so it may be possible to incorporate them.
- Managed services (Gradescope, Techful, etc.)
- Autograding takes about a minute and is slow.
- Currently, the system takes about one minute for grading because it needs to download the CML image each time. This runtime is a little too slow to be interactive. It is also undesirable from the point of view of consuming the free quota of actions described below.
- To solve this problem, you can use actions/cache or self-hosted runner. The self-hosted runner means that you set up your own PC and run your actions there, not on GitHub’s server. With this, you can pull the container once and reuse it the next time. This operation is a bit of a contradiction since one of the main advantages of my system is that it doesn’t require any infrastructure.
- What happens if we use up a free quota for actions?
- If you use up the free quota, you will not be able to score anymore (you will have to pay for it). In that case, again, you can use the self-hosted runner, which is free no matter how much you use it.
- Can I use this system in my lectures?
- Of course you can! I have licensed the template code under the MIT license, so please feel free to use it. Also, if you use it in your lectures, please let me know (I will add your name to this blog).